Testable Enterprise - Kubernetes
- Prerequisites
- Installation
- Updates
- Launching More Test Runners
- Launching External Test Runners
- Certificate Authority
Installing Testable into a Kubernetes cluster is our recommended route for a production deployment. This will work both in your data center or in the cloud via services like the AWS Kubernetes Service, the Azure Kubernetes Service, or the Google Cloud Kubernetes Service.
Prerequisites
System Requirements
- Testable Services & Storage: The core deployments will require 8 vCPU, 32GB RAM, and 100GB of storage in your cluster.
- Test Runner: Each additional test runner will require ~100MB RAM and 5GB storage when not running any tests. Resource utilization per virtual user depends on the scenario type (e.g. OpenFin vs Webdriver.io vs JMeter vs Node.js). The test runner agent will attempt to utilize all resources accessible to it for generating virtual users.
Required Images and Helm Charts
If your company has its own container registry you will need to pull in the following container images available on Docker Hub:
Testable
- testable/services:latest
- testable/web:latest
- testable/agent:onprem
- testable/proxy:latest
- testable/services-with-browsers:latest (optional - see the Browser Versions section below)
Packaged Helm Charts (if not hosted separately)
Installation
Follow below steps to install Testable Helm Chart on Kubernetes:
-
Configure your installation using a values.yaml file. An example file with documentation for each property can be found at sample-values.yaml.
-
Add Testable as a helm repo:
helm repo add testable https://testable-charts.s3.us-east-1.amazonaws.com -
Flavours of deployment:
No SSL
- Create a new namespace,
testable, and deploy the Testable platform there:helm install --create-namespace --namespace [namespace] --timeout 900s -f my-values.yaml testable testable/testable
With SSL
- SSL can be enabled on the website, micro-services, recording gateway, and for DB connections from the micro-services to the DB. For more details, read the SSL section in sample-values.yaml.
- All SSL related Kubernetes secrets need to be created before installing the Testable Helm chart so you can reference them in your values.yaml file.
- Once the namespace and secrets are created, you can install the Testable Helm chart:
helm install --namespace [namespace] --timeout 900s -f my-values.yaml testable testable/testable
- Create a new namespace,
- After helm chart is installed, to find the website URL check the Testable web service using the command:
kubectl --namespace=testable describe svc testable-web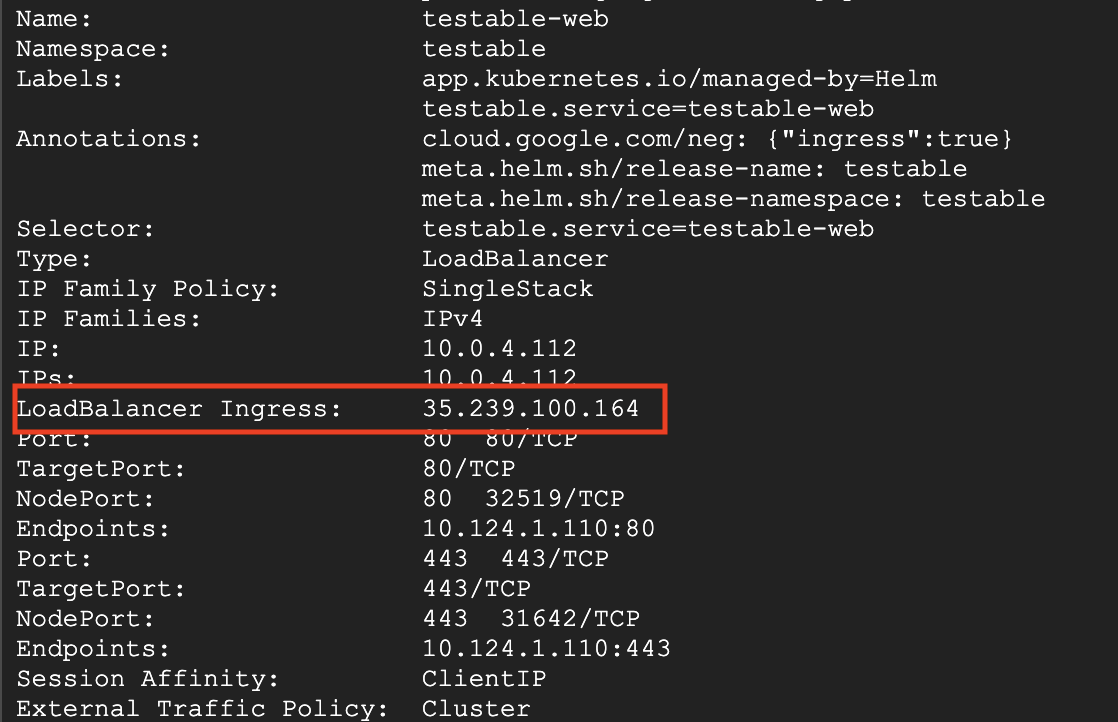
- The value of LoadBalancer Ingress in the response is the URL to your application. Feel free to configure this in your DNS for easier access via a more memorable URL.
- Repeat step 4 for other services as needed:
a.
testable-api: Testable API service b.testable-coordinator-service: Access point for test runners. Also exposes remote Selenium API (/wd/hub), Playwright API (/playwright), and Puppeteer/CDP API (/cdp) for remote browser sessions. c.testable-gateway: Reverse proxy recording gateway d.testabe-proxy: HTTP forward proxy recording gateway - If
sslis enabled then you need to point the DNS records to the addresses extracted from the step 5.
Updates
To update the containers with the latest image you can restart all the deployments:
kubectl rollout restart deployment --namespace testable
To update your installation after making changes to your config file:
helm upgrade -f helm-chart-values.yaml testable https://testable-onprem.s3.amazonaws.com/testable-latest.tgz
Browser Versions
This section is only relevant if you plan to run browser based tests with a tool like Selenium AND you would like to either:
- Use old versions of browsers
- Use the latest version of browsers without having to update the test runner container image
Our test runner image comes with the latest version of each browser pre-installed on it as of the time the container is built. Testable will validate new browser releases and then make them available to our customers. The new version, as well as older versions, are available in two ways:
- Auto-Update: Testable will download the required version automatically from an AWS S3 bucket into your deployment. This requires the deployed environment to have the ability to make HTTP requests out to S3. The S3 bucket has browser versions going back many years available.
- Via Browsers Cache Container: We also publish a version of our micro-services container that includes the last 10 versions of each browser. This can be deployed in your environment if you want to avoid any external network requests. Every time a new browser version is available for our customers we will publish a new build of this container image for you to deploy.
Launching More Test Runners
Each test runner region has a deployment named testable-test-runner-[region-name]. You can simply scale this up with kubectl:
kubectl scale --replicas=3 deployment testable-test-runner-[region-name]
To persist this change for future deployments make sure to update the regions property in your values.yaml file.
To launch a new test runner region, add it to your values.yaml file in the regions dictionary and then run helm upgrade -f my-values.yaml testable https://testable-onprem.s3.amazonaws.com/testable-latest.tgz.
Launching External Test Runners
To launch test runners from outside of the Kubernetes cluster follow this documentation.
You will need to pass a AGENT_SERVER_URL environment variable to either connect via the website at /agents (i.e. http[s]://[testable-web-service-lb-ip-or-dns]/agents) or directly via the coordinator service (i.e. http[s]://[testable-coordinator-service-lb-ip-or-dns]).
Certificate Authority
If the websites and APIs you plan to test are available over TLS using a corporate certificate authority (CA) then you will need to make sure the test runner is aware of your CA.
How to do this depends on the scenario type and whether it is run via the Java Virtual Machine, Node.js, or Python.
First you will need to make sure you have unzipped our helm chart as this will require updating templates/test-runner-deployment.yaml.
JVM based scenarios: JMeter, Gatling, Java, Selenium Java, Serenity
Step 1: Create a Kubernetes secret that contains the cacerts file with your CA. Step 2: In test-runner-deployment.yaml add a volume and volume mount so that the cacerts file from the secret is mounted into each JVM version we support:
spec:
  containers:
  - env: ...
    volumeMounts:
    - name: cacerts1_8
      mountPath: "/usr/lib/jvm/jdk-1.8.0/jre/lib/security/cacerts"
      readOnly: true
    - name: cacerts11
      mountPath: "/usr/lib/jvm/jdk-11.0.15/jre/lib/security/cacerts"
      readOnly: true
    - name: cacerts17
      mountPath: "/usr/lib/jvm/jdk-17.0.3/jre/lib/security/cacerts"
      readOnly: true
  volumes:
  - name: cacerts1_8
    secret:
      secretName: mycacerts
      optional: false
  - name: cacerts11
    secret:
      secretName: mycacerts
      optional: false
  - name: cacerts17
    secret:
      secretName: mycacerts
      optional: false
restartPolicy: Always
Node.js based scenarios: Node.js Script, Puppeteer, Playwright, Webdriver.io, Protractor, Postman
Step 1: Create a Kubernetes secret with the contents of a PEM file consisting of one or more trusted certificates. Step 2: In test-runner-deployment.yaml add a volume and volume mount and set it as the NODE_EXTRA_CA_CERTS environment variable.
spec:
  containers:
  - env:
      ...
      - name: NODE_EXTRA_CA_CERTS
        value: "home/testable/ca.pem"
    volumeMounts:
    - name: capem
      mountPath: "/home/testable/ca.pem"
  volumes:
  - name: mycapem
    secret:
      secretName: mycapem
      optional: false
restartPolicy: Always
Python based scenarios: Locust
This is very similar to Node.js based scenario types but with a different environment variable name.
Step 1: Create a Kubernetes secret with the contents of a PEM file consisting of one or more trusted certificates. Step 2: In test-runner-deployment.yaml add a volume and volume mount and set it as the REQUESTS_CA_BUNDLE environment variable.
spec:
  containers:
  - env:
      ...
      - name: REQUESTS_CA_BUNDLE
        value: "home/testable/ca.pem"
    volumeMounts:
    - name: capem
      mountPath: "/home/testable/ca.pem"
  volumes:
  - name: mycapem
    secret:
      secretName: mycapem
      optional: false
restartPolicy: Always